BYOD onboarding: How to set up staff and guest Access
Published
A new starter arrives with a personal phone, a contractor turns up with an older laptop, and a guest needs WiFi before a meeting begins. If all three get the same shared password, access is easy to hand out and hard to control later. BYOD onboarding works better when you choose a route for each kind of device, then plan what happens when someone can't or won't enroll it.
The key is to treat onboarding as a lifecycle. A sign-in page can record who connected, but it doesn't establish that a device is secure, decide what it can reach, or make sure its access can be revoked.
Table of Contents
- Choosing a BYOD Onboarding Method
- Set Up the Captive Portal and SSO Sign-In
- Issue EAP-TLS Certificates Through Your MDM
- MDMless Onboarding and Per-Device Keys for Shared Devices
- Fallback Routes for Unsupported and Partly Managed Devices
- Consent, Privacy and Offboarding Rules
- Confirm the Route Order and Pilot It First
Choosing a BYOD Onboarding Method
| Method | Device management needed | Credential issued | Best for | Main limitation |
|---|---|---|---|---|
| Captive portal with SSO, Google, Apple, Facebook or SMS | None | Browser session with recorded consent | Guests and occasional visitors | Portal sign-in doesn't prove device posture |
| MDM-issued EAP-TLS certificate over SCEP | Enrolled MDM such as Intune or Jamf Pro | Per-device certificate | Managed staff cell phones and laptops | Unenrolled personal devices can't join |
| MDMless app-installed WiFi pass | Installer app, no MDM | Per-user or per-device pass | Janitorial crew, temp agency staff, personal cell phones | Weaker visibility over device posture |
| Per-device xPSK key | None on the device | Unique pre-shared key per device | Shared POS terminals, IoT, residents | Needs key management and a revocation process |
| Passpoint or OpenRoaming profile | Profile installed on the device | Certificate-based identity | Returning guests across venues | Only devices that support Passpoint |
These routes suit different levels of trust and different user expectations. A browser portal keeps guest access simple, but it can't check a phone's security posture. A certificate gives a managed device a stronger identity at connection time, but it requires enrollment. For devices that can't take an MDM profile, a pass or unique key offers an alternative to a password shared across a whole site.
BYOD became an access-control requirement as personal devices moved into everyday work. In a 2012 Cisco IBSG survey of 600 U.S. IT and business leaders, 95% said their organizations permitted employee-owned devices in some form, and 84% both allowed personal devices and provided at least some support (Cisco's 2012 BYOD study). That distinction matters: allowing a device onto WiFi isn't the same as supporting it, assigning it appropriate access, or preparing to remove its credentials.
Choose the default before the exception
Start by assigning one default route to each device class. Managed staff devices should use certificates; guests should use a portal; devices without MDM should get an app-installed pass or unique key, not a shared password. Returning guests may suit Passpoint or OpenRoaming if their devices support the profile.
Then check whether your chosen default requires something a user won't provide, such as permission to manage a personal phone. Send only those exceptions to the fallback routes, rather than weakening the default for everyone. A WiFi access control overview can help teams map authentication to access policy, but your device classes and network permissions should drive the final choice.
Set Up the Captive Portal and SSO Sign-In
A captive portal is a practical default for guests because they can sign in without installing a management profile. It's also useful when you need to record consent or let visitors authenticate using an account they already have. The important design decision is where the portal sends each user after sign-in: authentication should lead to the right network, not grant broad access by default.
Build and test the sign-in flow
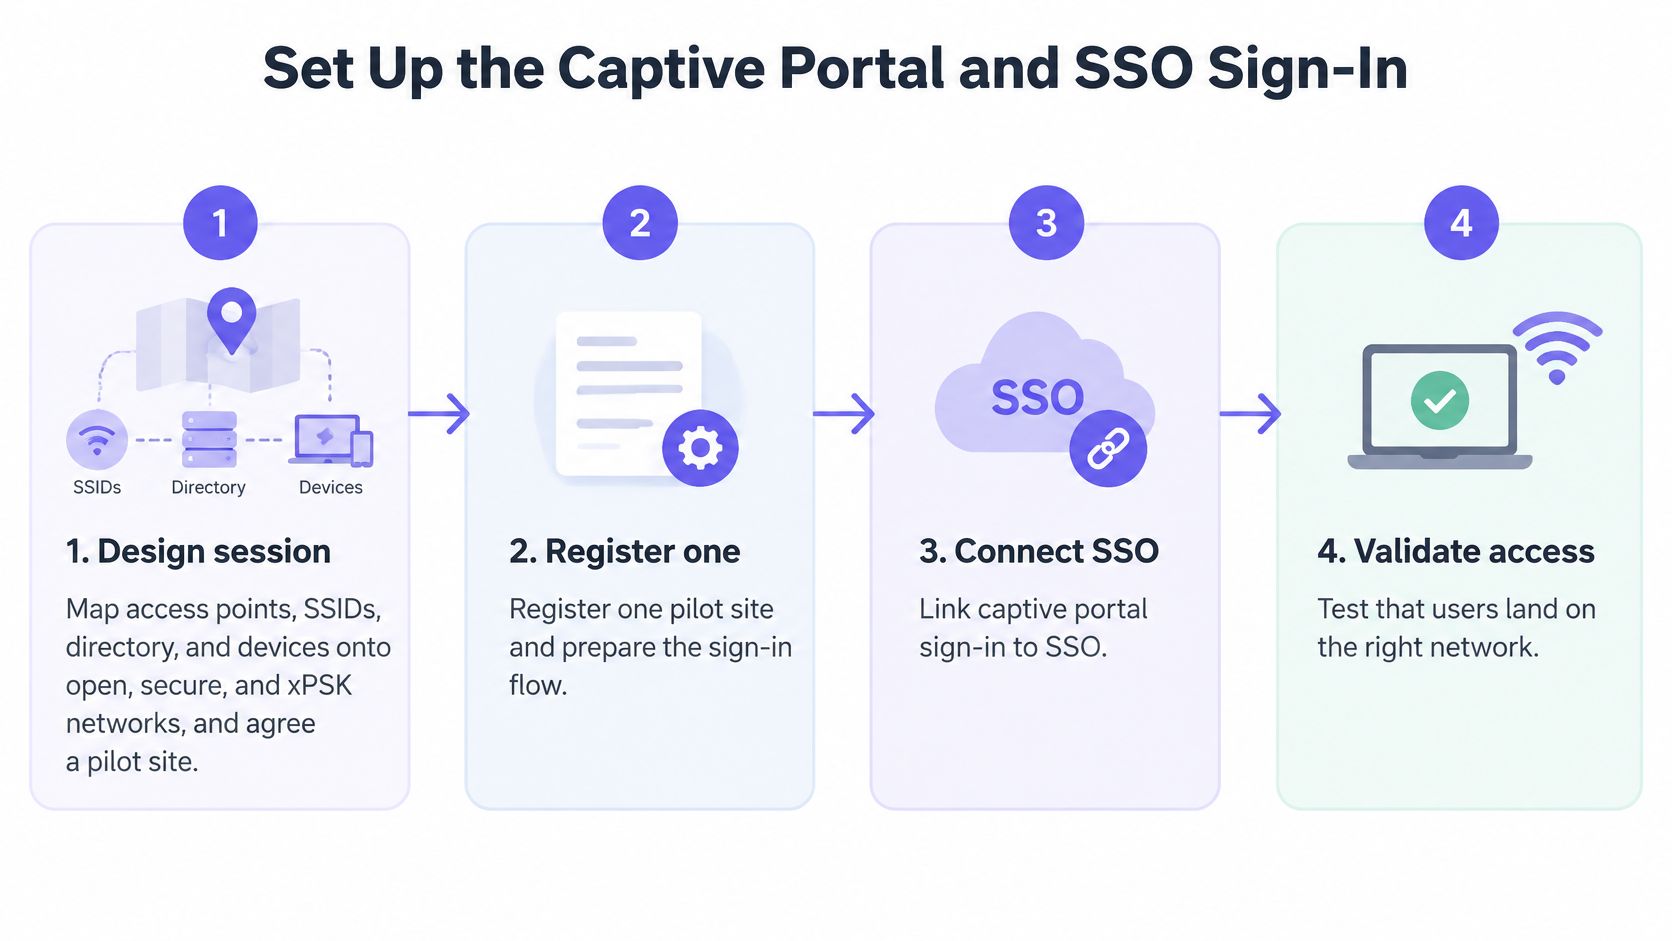
Map the network and choose a pilot site. In a design session, map access points, SSIDs, directory groups, and device classes onto open, secure, and xPSK networks. A network engineer should leave the team with a plan and a pilot site, so the configuration reflects the physical estate rather than an idealized diagram.
Register one identity application. Set up an application in Entra ID, Google Workspace, or Okta and grant the directory access required for sign-in. Use a pilot registration first, so you can check permissions and the login experience before expanding the deployment.
Add the portal and RADIUS details to the controller. Configure the RADIUS server and splash URL. Once the app registration exists, setting up the customer side takes under 15 minutes, including these controller changes.
Choose sign-in methods for each audience. Use SSO for staff who need an organization identity, Google or Apple for personal accounts, and Facebook where visitors expect it. SMS one-time passcodes give visitors without a suitable account another route.
Brand the portal and make consent clear. Write the consent text in plain language and record an entry for every sign-in. Put the notice where the user can read it before accepting, not below the button they need to press.
Test real devices on the guest network. Connect a personal iPhone, an Android phone, and a Windows laptop. Confirm each user lands on the guest VLAN and that client isolation prevents guest devices from reaching one another.
The usual pilot slips are a splash URL pointing to the wrong controller, consent text hidden below the sign-in button, and testing only with corporate devices. Each can make a portal look successful in a narrow test while failing for the people who need it. Teams using Okta can also review this guide to Okta WiFi authentication when planning the identity connection.
Issue EAP-TLS Certificates Through Your MDM
For managed staff devices, a certificate-based join ties network access to an enrolled device instead of relying on a shared WiFi password. The device proves its identity during the connection, and a user identity can determine which network permissions apply. NIST describes a provisioned certificate as a way to identify and authenticate a mobile device at the connection point, and notes that combining it with user credentials can provide two-factor authentication (NIST's mobile device security guidance).
Scale is rarely the problem here. Delivering certificates over SCEP takes five to ten minutes once for the whole organization, so on cutover night managed laptops and cell phones receive their certificate from the MDM and join automatically. The harder work is deciding which checks a device must pass before that certificate is trusted.
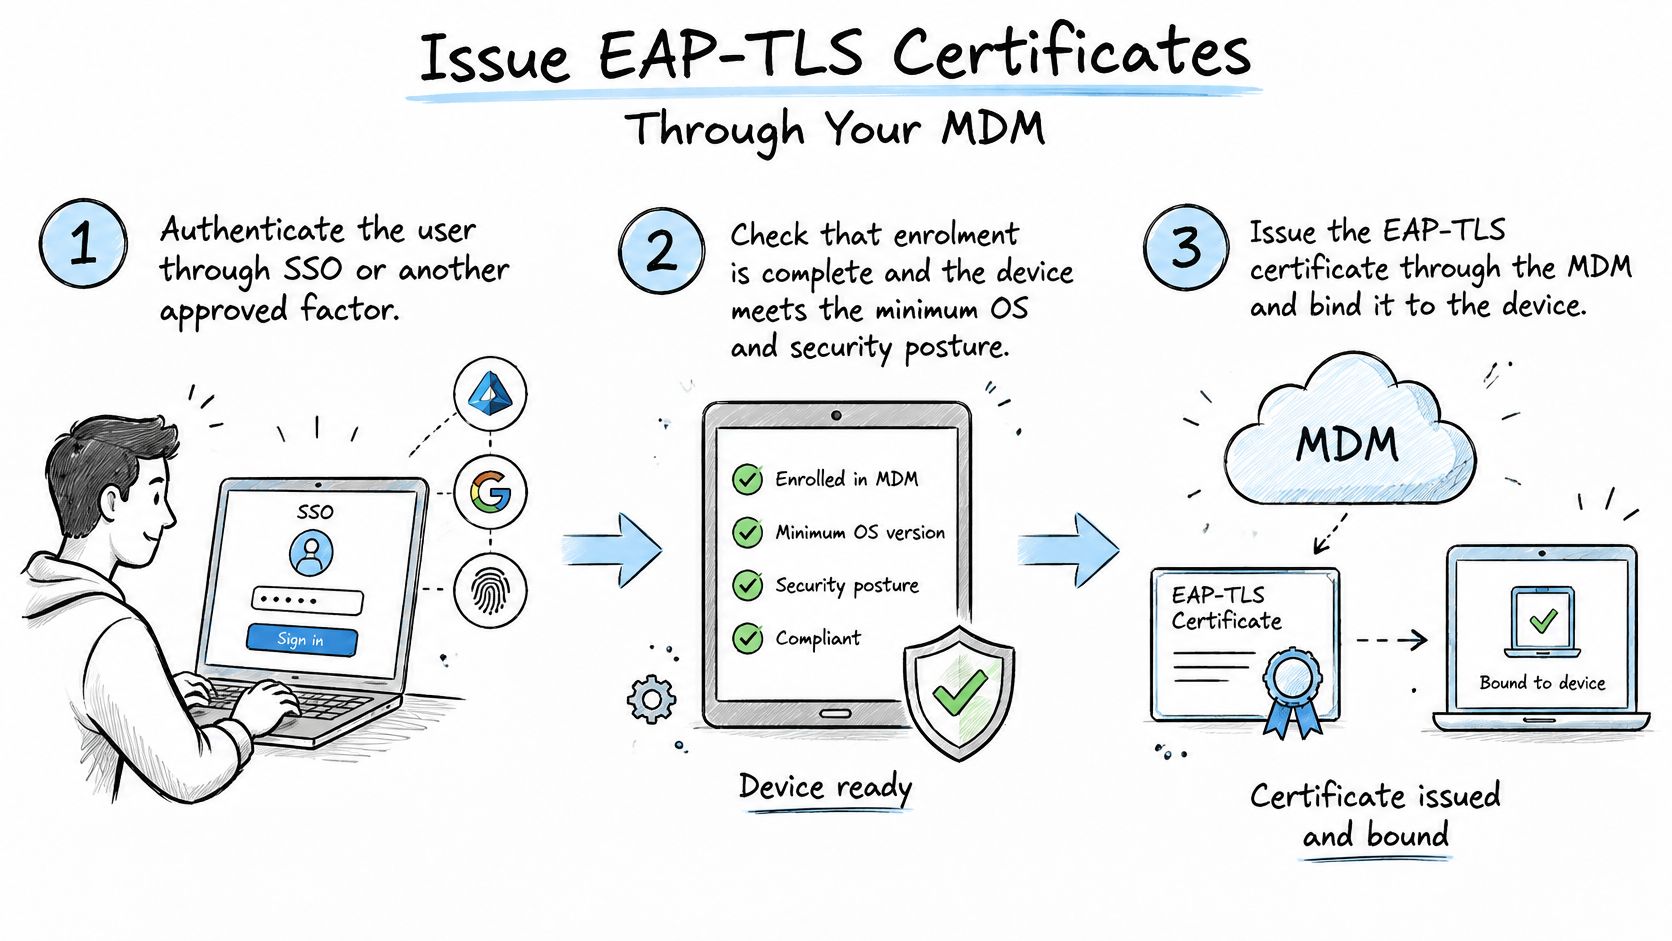
Make device trust part of the join
Authenticate the user. Start with SSO or another approved factor, so the network can associate a device with a known person or account.
Check enrollment and posture. Confirm that the device is enrolled and meets the organization's minimum OS and security requirements. Treat a personally owned device as potentially untrusted until it passes those checks.
Issue a device-bound certificate. Use the MDM to deliver the certificate over SCEP. A device-bound credential is more manageable than a shared secret because it can be tied to one enrolled endpoint and revoked without touching anything else.
Connect using EAP-TLS. Configure the client and network to validate the relevant certificates. User credentials and the device certificate then provide distinct identity checks at connection time.
Assign access by group. Map directory groups to least-privilege VLANs, so a staff member's role determines what the session can reach. A successful authentication should not automatically mean access to every internal service.
Re-check compliance continuously. Don't limit policy evaluation to initial enrollment. Reassess device posture and remove access when a device no longer meets requirements, or when the account behind it is disabled.
Common help-desk causes include unsupported OS versions, expired certificates, incorrect system time, missing trust-chain certificates, private MAC-address randomization, and users declining management permissions. Track failures by device model and OS version, because a healthy overall enrollment rate can conceal repeated breakage on one platform.
- Unsupported OS: Offer an approved upgrade path or route the device to restricted access.
- Expired certificate: Automate renewal early enough to avoid an outage when a credential expires.
- Incorrect time or missing trust chain: Check the device clock and certificate installation before changing network policy.
- Private MAC randomization: Confirm whether the network's policy depends on a stable device address and provide platform-specific setup instructions.
- Declined management permissions: Explain what management can see and offer a fallback route instead of granting broad access.
The compliance baseline itself stays simple. Devices should receive security updates promptly and on a regular schedule, use screen locking, install apps only from authorized sources, and be barred from joining if rooted or jailbroken. A device that fails those posture checks belongs on a segregated, low-privilege network, not the corporate one.
The sequence is easier to understand when you can see the certificate flow in context. The video below provides a visual companion to the onboarding steps.
MDMless Onboarding and Per-Device Keys for Shared Devices
Some devices can't complete MDM enrollment. That includes a personal phone whose owner won't permit management, a shared register or kiosk, and an IoT sensor with no suitable enrollment interface. The answer isn't to put all of them on the staff network. Use a restricted route that gives each device an identifiable credential and a clear owner.
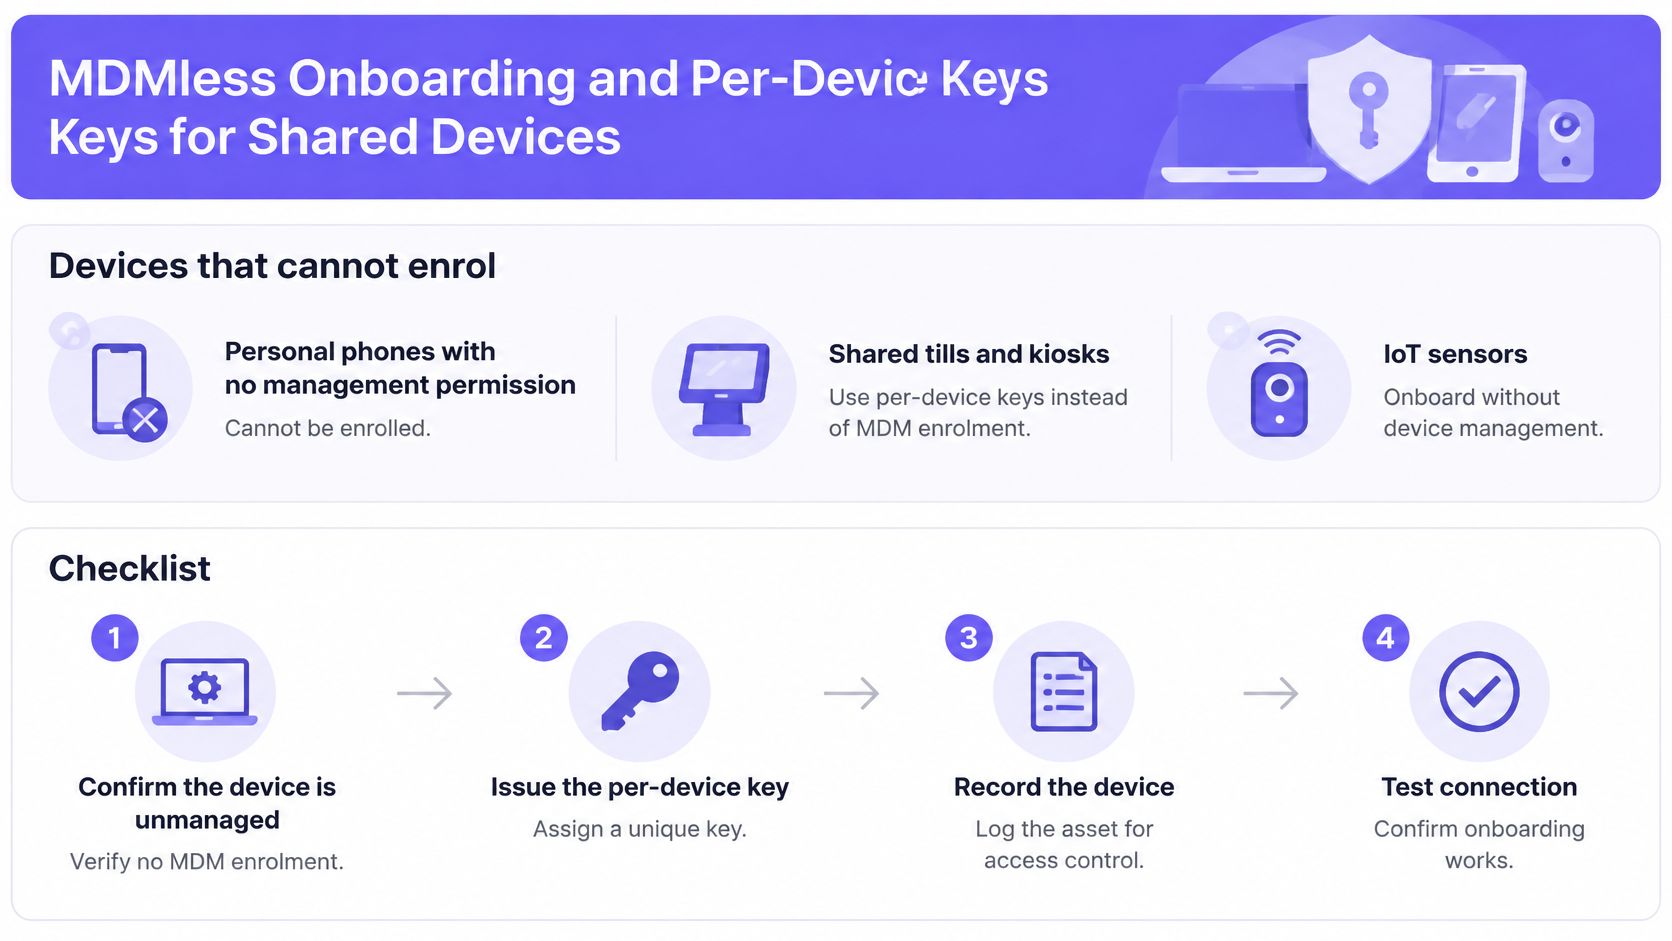
Use a pass or key with a defined owner
Confirm the device is unmanaged or unsupported. Check that it can't use the certificate route, and that its owner agrees to any installer app. This keeps an exception from becoming the default solely because enrollment is inconvenient.
Give personal cell phones an app-installed WiFi pass. The user signs in and installs the pass without enrolling the whole phone in MDM. For a managed rollout, personal cell phones can install a WiFi pass from the Purple app in two taps on cutover night.
Give each shared terminal its own xPSK key. Put the POS terminal or kiosk on its own VLAN, with a bandwidth limit suited to its job. A unique key prevents one password from spreading across every register.
Match the key lifetime to the use. Set it to fit the booking, contract, or shift pattern. A temporary credential should not remain useful after the person or device no longer needs access.
Record who holds each key. Keep a device or user owner associated with the credential, so support staff can identify which access to revoke when a device is lost or a worker leaves.
Revoke the key and test the result. Remove access on departure and confirm that the device drops off the network. Revocation is part of onboarding design, not a task to invent after a problem.
These routes provide less visibility into device posture than a certificate, so keep them on restricted networks rather than the staff VLAN. The operational trade-off is straightforward: a per-device key takes more care to issue and track, but it limits the reach of a compromised credential.
Fallback Routes for Unsupported and Partly Managed Devices
Support isn't consistent enough to make “enroll or lose access” a workable policy for every employee. A Verizon 2025 mobile security report found that 15% of surveyed organizations provided full support for all mobile-device types, while 32% offered ad hoc support, 27% supported only designated models, and 23% provided no support. The gap affects people using older devices, contractors, frontline staff, and employees who don't consent to broad monitoring of a personal cell phone.
| Device case | Onboarding route | Network access | Check before granting |
|---|---|---|---|
| Fully managed, supported OS | MDM certificate over EAP-TLS | Secure network by directory group | Compliance status and certificate expiration |
| Personal phone, no management permission | Captive portal or app WiFi pass | Guest VLAN with client isolation | Consent recorded, no corporate VLAN |
| Unsupported OS version | Browser-only access to named apps | Segregated low-privilege network | Upgrade date and approved app list |
| Shared register or kiosk | Per-device xPSK key | Own VLAN with bandwidth limit | Key owner and revocation path |
| Contractor or temporary worker | Time-limited guest sign-in or loan device | Guest VLAN, expiring at contract end | Contract end date and named sponsor |
| Accessibility or older-device appeal | Manual review with a loan device | Limited to approved apps | Review date and named owner |
Keep the exception narrow and documented
Give each device the least access that does the job. A personal phone that only needs browser access to a named service doesn't need a route to internal applications or the corporate VLAN. A shared POS terminal needs its assigned services, and its credential needs a named owner and revocation path.
Publish a device-compatibility matrix so staff can check whether their OS and device can enroll before they arrive at a site. Keep an inventory of unsupported operating systems and applications, and record which fallback route applies to each. For contractors and visitors, a time-limited network route for contractors and visitors helps make expiration and sponsorship explicit.
A rigid rule can make security worse if it drives employees toward personal hotspots, shared passwords, or other unmanaged workarounds. A restricted, documented route is often safer than denying access without an alternative.
Consent, Privacy and Offboarding Rules
“Can I refuse BYOD, and exactly what will my employer be able to see or erase?” Put the answer in the onboarding notice, before a worker is asked to accept a profile or install an app. Technical authentication doesn't show that someone understood the terms or felt free to choose.
In a care-sector survey, 50% of providers used BYOD, but only half of those had a BYOD policy; just 40% of staff using personal devices remembered signing any policy or guidance. A separate 2025 survey found 70% of staff preferred organization-provided devices (the 2025 adult social care BYOD report). Those findings challenge the assumption that personal-device access is automatically cheaper or more convenient for workers.
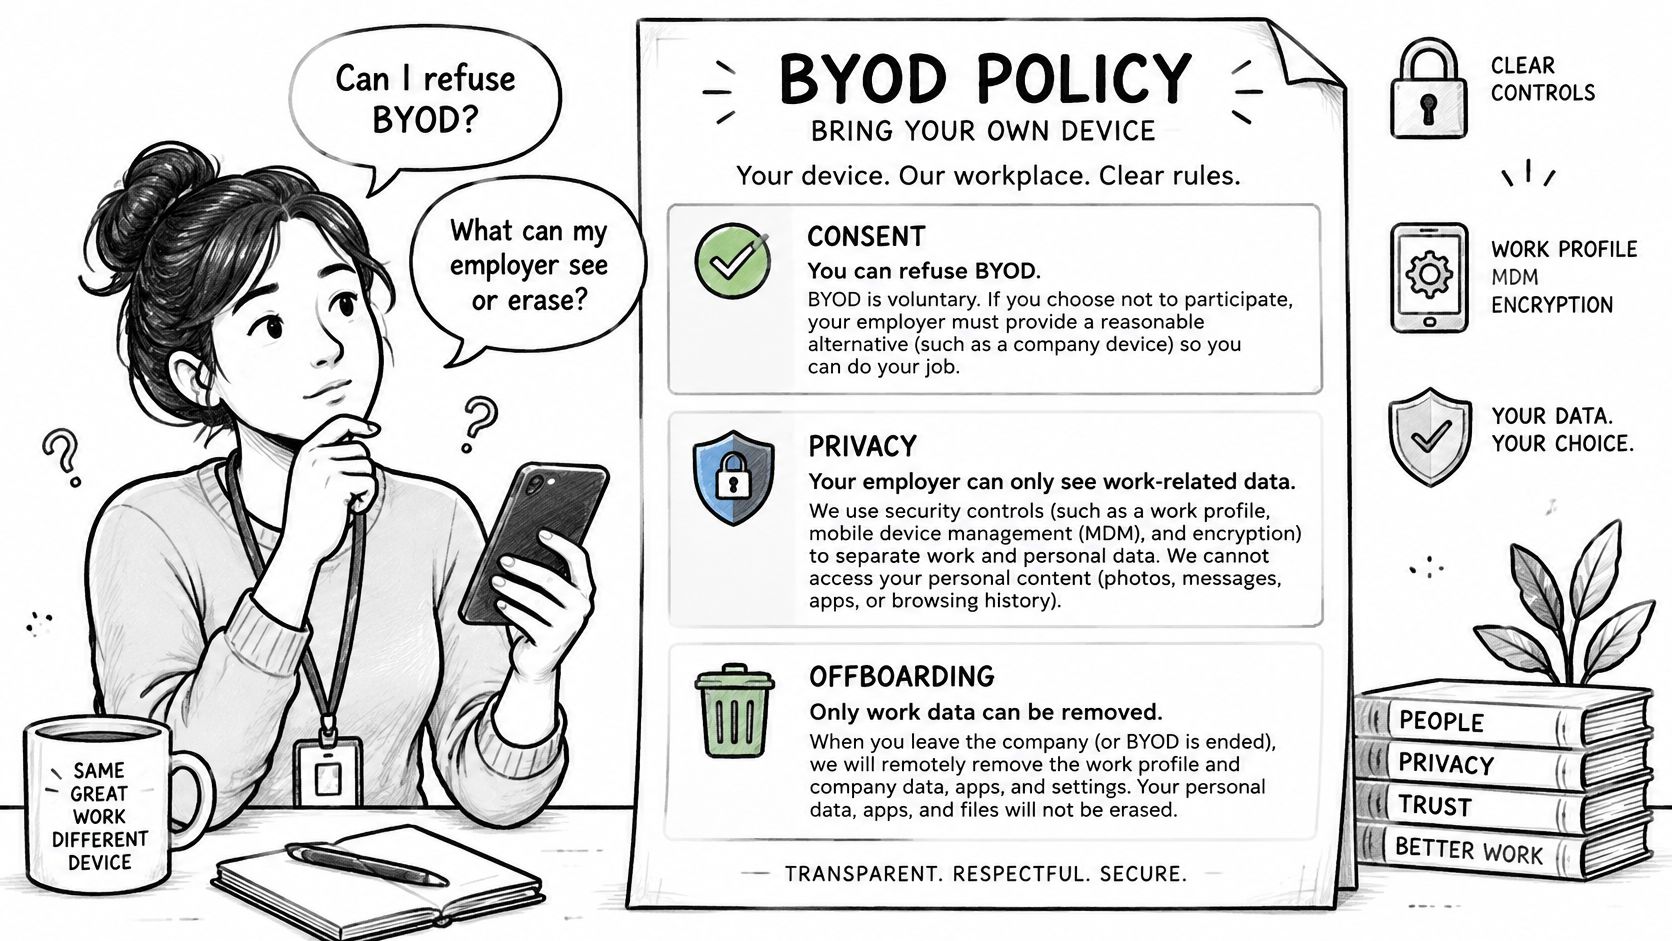
The notice should say, in plain language:
- What security telemetry is collected, and what personal content the organization cannot see.
- What can be removed, including confirmation that removing a work profile won't erase personal content.
- Who pays for work-related mobile data and device wear, with reimbursement rules for the relevant country.
- What the alternative is if the worker declines personal-device management.
A checkbox isn't meaningful consent if participation is effectively compulsory. Offer a loan device or another access route, and ask for consent again if monitoring or data use changes. For visitor check-in processes, teams can also use guidance to verify guest IDs before check-in as a prompt to consider what identity information is necessary and how it should be handled.
Offboarding must remove the certificate, management profile, cached tokens, and any xPSK key associated with the device. A Purple Access demo can show an engineer issuing and revoking a key on a live network, using one apartment's devices: a lock, a thermostat, a guest's laptop, and a client's staff phone.
- Issue a key on a live device.
- Revoke it.
- Time how long access takes to stop.
- Record the result as the pilot's revocation pass mark.
Confirm the Route Order and Pilot It First
Roll out the routes in an order that keeps exceptions from defining the whole network. Each device class gets a default, while the pilot confirms that the route works with the identities, controllers, and devices at a real site.
Start with managed staff devices on EAP-TLS. Use the certificate route for enrolled laptops and cell phones, with access tied to directory groups and a tested revocation path.
Add the guest portal. Make the sign-in experience clear and record consent on each guest session.
Move personal and unmanaged staff cell phones to a WiFi pass. This gives users a route that doesn't require full device enrollment.
Put shared registers, kiosks, and IoT devices on unique xPSK keys. Assign each device to its own access policy and record who owns its credential.
Apply fallback routes only to exceptions. Use browser-only access, a guest or contractor network, a loan device, or a manual review where the default route isn't possible.
Set pilot measures before launch
Choose one pilot site and define pass marks before anyone begins enrollment. Measure enrollment completion, first successful authentication, help-desk contacts per 100 enrollments, and time to revoke access. If you set the thresholds after the pilot, it's too easy to call a weak result acceptable because the site is already live.
Book a design session and bring your SSID list, access point vendor, directory, and MDM. A network engineer can map those details to the open, secure, and xPSK networks and validate the plan against the pilot site before rollout. The demo request captures the organization and contact details, along with what currently runs on the customer's WiFi, including SSIDs, access point vendor, directory, and MDM.
Purple Access supports captive-portal sign-in and consent, EAP-TLS certificates through MDM, and per-device keys for unmanaged equipment. Visit Purple Access to arrange a demo and bring your device and network details into the design session.